Showing posts with label Simple. Show all posts

Friday, March 1, 2013

Slight Food Fustration


So here we are, Hubby and I are ending week 18 of our pregnancy. Not gonna lie, I have had it pretty easy compared to others. I know of others who can't get out of bed due to morning sickness, bad cramps, and then those who have two year olds. Those people just look at me and ask if I am ready, and I figure if I can get the Diva of Diva's to say please and thank you and become America's Sweetheart in one short summer, I can handle my own kid, stay tuned.

My one complaint, is that I have become a slightly picky eater. I HATE that feeling. Trust me, I want to try it, I really really do, but I have had limitations. I love salads, and now I have to take them slow because they sound good but not always taste good. Cheese, certain cheeses just throw me off my game, luckily on valentine's day Hubby was all to kind to switch dishes with me when I made that mistake. (After working in restaurants for so long, I hate sending food back if it's not the waiter or the establishment's fault. I chose it, I need to suck it up.) What is even worse is coffee. My stomach does back flips when I smell it, which doesn't help with my new super power, Super Keen Smell. That's right, I can smell you from a mile away, so forget trying to attack or surprise me, I know you are coming. There was a magical week when I could drink it again, but then something happened over the weekend or the baby took the week off. One or the other.


So poor Hubby has been so patient with my limitations and super supportive. He worries, but don't worry I am not starving and my belly proves the baby is getting enough nutrients. But last night I just really wanted something with vegetables and I had to trick my belly/baby to accept these with out me suffering. So I thought, why not a chicken and broccoli casserole. Now my casserole has way more than those two things.

So for picky eaters, young and old a like, I hope you love this simple, quick and very yummy recipe.

Start off with:
  • A cup of uncooked rice (go ahead and make to hearts desire)
  • 2-3 three heads of fresh broccoli. Frozen is fine, but they come out to the same most of the times, so I usually go fresh.
  • a handful of fresh spinach, again canned or frozen is fine, we try to eat as fresh as possible.
  • 6 small mushrooms/4 large
  • 2 yellow squash (optional, I just happened to have them)
  • Chicken, we made some the night before but use 1-2 chicken breasts)
  • 1 can of cream of mushroom
Ok so go ahead and start slicing and sauteing your chicken if it's not already cooked.  Then start on the rice. Remember 1 cup ends up being 3 cups, so you will have left overs.

Now with your chicken cooked, start adding your chopped veggies, I usually leave mushrooms and spinach last, because those cook so quickly in a pan. Broccoli & squash and as those soften then add the rest. You might want to pick a bigger pan than I did, because mine got full pretty quick. Baby needs those veggies!


When your rice is close to done, more than al dente but in that creamy stage, transfer it to your pan. Then add your can of cream of mushroom and a little water. Now mix all together. Your cream of mushroom is the glue to the casserole. Once it's all mixed thoroughly, you are done! If it's a little stiff, just a little water bit by bit.


No serve in a bowl and enjoy! I sure did!!!

As always, Live, Laugh, Love.

Friday, December 14, 2012

Left-Over Mac and Cheese


OK so I know, I have left you alone for two whole weeks! I do apologize but in my defense Hubby and I have been super busy with the holiday season traveling, and working on some top super secret stuff. Don't worry you will know all soon enough! I will prove to you in my next post how we have been so busy to. We have been one crafty little family, even little Ollie is helping out too!

So another reason why I have not posted at all this week, is I have been sick. Hubby was out of town for work and I was trying hard not to cough up a lung. But I am feeling 85.6784% better now. Hopefully by Sunday I will be 100%. Just so glad this didn't happen while traveling to visit family for Christmas.

So all week I have had no appetite what so ever! I come home, barely have energy to cook ramen. Since Hubby was gone, Ollie tried his hardest to take care of mom, but he doesn't have thumbs so it's kind of hard. So finally last night when I was feeling better, I wanted to make something comforting, delish, and using stuff in my house without having to go to the store! (Do you blame me? I already had my PJ's on.) So I decided to make Mac &Cheese with my left overs.

So I pillaged my fridge and pulled out left over green peas, a couple of mushrooms, cherry tomatoes, and chicken. I really wanted bacon, but I was out and again the mission was for me not to go to the store. You can use any kind of cheese you have or desire, I have done a Gouda mac and cheese before. So I pulled out the Mexican mix cheese I had and some Velveeta.

Now let me tell you my brief opinion of Velveeta. You can ask any of my friends, I am not a huge fan of American cheese unless it is from Subway or in a grilled cheese. Those are two of my very few exceptions. I am also not a fan of Velveeta. Give me a good mozzarella or provolone, how about Cheddar, who does not like Cheddar? But in Hubby's opinion, it's what qualifies you to be an American and has to be in Mac &Cheese no matter what or it is not cheesy enough. So if I expect him to eat my home made mac & cheese, it has to have Velveeta in it. You have to pick your battles right?

So let's get started. I chopped up one whole chicken breast and started it to saute in some oil. While that started, I started my pasta to boil.

When the chicken was getting close to being cooked through, I added my chopped mushrooms, peas, and quartered cherry tomatoes to the saute pan. Cook till it is desired texture and chicken is thoroughly cooked.

Now when your pasta is cooked and drained, add your chicken saute to the same pot as the pasta. You do not want it to cool, it is very important. Thoroughly mix together.


Now as in most things I do, this is not scientific. I added one part Velveeta and one part Mexican cheese mix. (About 2 oz. for the amount I used, but you might need more if you make a bigger pot.) Now work those upper arms and stir constantly still all your cheese clumps are gone. I also add a little milk to help with the creaminess. If you feel like you need more cheese (who doesn't like cheese?) then add more of your favorite, clearly I did not add more Velveeta.

So keep on stirring, you think you are done, but that Velveeta is a tricky beast and tends to hide in the depths of the pot.
Your ending mixture should look some like this. If your mac is too stiff, then add a smidgen more milk till you get the desired cream texture.
Sprinkle a little pepper and salt, yumm
Multi bene! Your left over mac & cheese is done. What would you add to your left over Mac & Cheese? And remember Live, Laugh, and Love!

Thursday, November 1, 2012

SMASHED Potatoes


So I have been talking about them long enough, here is a super awesome easy side if you need something easy and cheap. I call 'em SMASHED potatoes. When I told Hubby, he got so excited (I promise you he acts 6 or 12 half the time, depends on the day) because he got to smash something. This is a fun dish to do with little ones (or those who act like little ones at heart) or even after your have had a stressful day. What you do in your own home is your own business, I don't need to see and I won't judge, lol.

Alright here is what you are going to need:
Red Potatoes, about 1-2 per person. Maybe 3 if you are really hungry.
Olive Oil
Salt and Pepper
Any bake potato fixings you like.
Set your oven to 350

So start off boiling your potatoes. You do not want them over done to where you can mash them, but you want them done enough to where you can slide a knife or fork in and out of it easily.
As always, drizzle your pan with a little olive oil
Easiness of moving the fork in and out of the potatoe
So once your potatoes tender, then place them on your oiled up pan. You don't want them cramped and right next to each other. It's ok to give them a little breathin' room, trust me they will appreciate it in the long run.

I Crush, I mean SMASH, you!

 Now here is the fun part! Take your potato masher and SMASH them once in each direction. You want them to crack open for you and succumb to your power of the SMASH. (Can you tell we had fun making this side?)


 Next drizzle a little olive oil over your newly smashed potatoes.

 Now add some salt, pepper, maybe some chopped green onion. Don't add cheese if you want to do that yet. After you have seasoned to your hearts desire, go ahead and place your Smashed beauties into the oven at 350 for about 10-12 minutes. You just want them to firm/crisp up a little, so don't go crazy.
So after they are done you can add your other fixings to them. Hubby hates sour cream so we usually don't buy it (I know he is weird). If you want to add some cheese and you want it a little melted. Take out your potatoes about 3 minutes early and put it on them and put back for the remaining time. Well as always Live, Laugh, Love!!!

Saturday, September 8, 2012

A Super Easy Skirt, Trust Me


Ok now don't be afraid the sewing machine will not hurt you and it is not super hard to manage. The skirt I made for this is so easy, it is possibly the perfect project to get you started on sewing if you have every thought about it. I always tell everyone that pillows and skirts are the easiest beginners sewing projects to make because there is not that many seams to sew and if you make a mistake (which would be VERY hard to do) it's either easy to correct or hide. This is also a great skirt to start because I kid you not, I made little to no measurements. I like to stay in denial about my measurements as much as I can so this was great!

I made this skirt in an hour, because that is how long my attention span is for a major sewing project (hence why it took me a month to make Hubby's curtains when we were first dating, don't get me wrong, curtains are simple, but Hubby had to make complicated requests.) I wore this skirt to work the next day and everyone asked me where I bought it from. :) That is an awesome compliment. Ok so lets get started. The materials you need are below:

Supplies:

- Get at least 1-2 yards of 2 3/4 " elastic. Now I couldn't find the 2 3/4" so I just got three inches. I like wide looking belts anyways so it woks out.
- Now you can get 1 yard of fabric, but I always like to be prepared for mistakes or redos, or measurements so get at least a yard and a half or 2 yards of fabric that you like. Cotton is the easiest to work with and that is what I used in this skirt. I would advise getting something with a little play and stretch, like a jersey. It is more forgiving if you didn't measure right. 
               Also, patterns are cute and great, but I do recommend if this is your first time making a skirt, stick with a solid color. You won't have to worry about your pattern matching up and flowing. I usually don't care hence I stick with solids, harder to mess up.

-Get thread that you want to go with your outfit. I picked black because that was the color of the accent. It would help make it pop. You can do the main color, heck go psychedelic and get neon green. It's your skirt, make it yours.

- Optional- You can get some kind of accent or fringe. I went with a red and black theme, so I found some lace border material on sale, so why not!

So let's get started. First take your elastic and wrap it around your waist and/or where you want your skirt to sit. I like mine a little higher on the waist. Wrap it a little tight, so it gives some stretch, this is ok. I made mine natural and it made it a little big, so it slides a little. That's also easy to fix, just leave a message if you need that done ;)

Second, you are going to take your fabric and wrap it around your waist. Yup, don't measure it's a waste of time and if you are by yourself it makes it tricky to get an accurate reading. Wrap the fabric around to meet the end and I gave myself an inch or two extra wiggle room. I like my skirts to flow if I can. Then cut. Note: Make sure the fabric when wrapped around also meets where you want it to end also. So if you want the skirt to end at your knee, make sure the fabric meets there to, not just your waist.

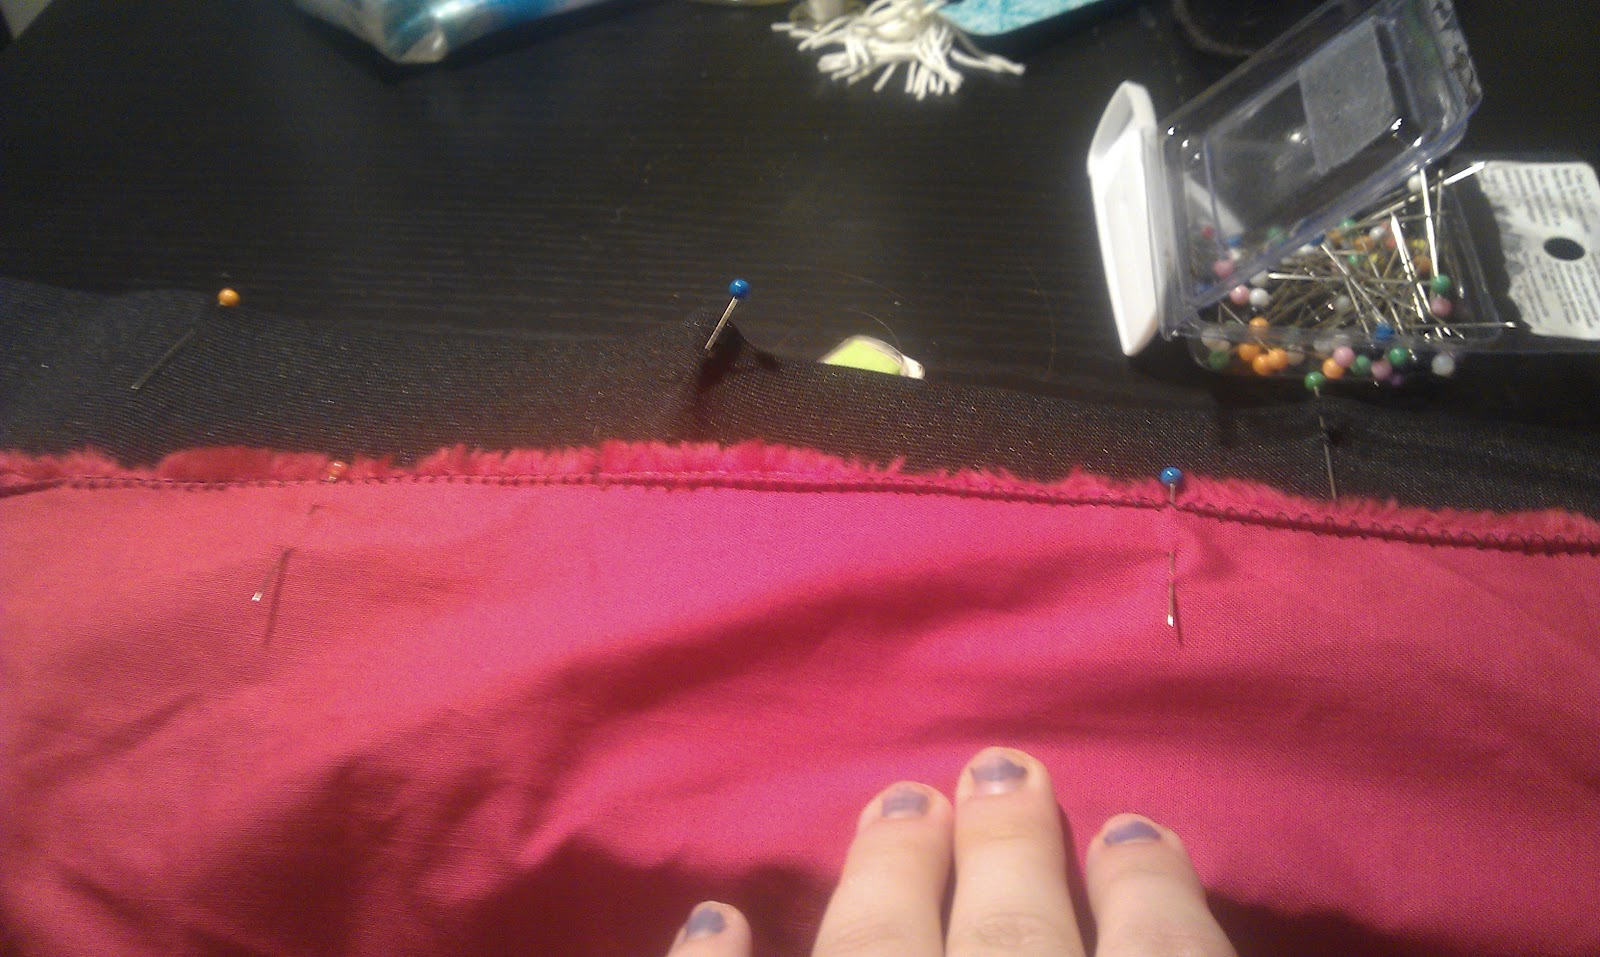
Next, on the top of the fabric just do a baste line. Don't worry about the terminology, all it means is to sew a line from one end to the other. It helps prevent the fabric from unraveling and fraying. The picture below is mine.

Ok now take that elastic that you wrapped around your waist and cut. Fold it in half and pin the line. Then fold each half in half and pin, and then repeat once more. You should now have 8 little sections. Do the same with your fabric.

Now match each pinned section of the fabric to your elastic. Your fabric will probably be longer than your elastic, and that is ok. You want it to gather in those sections. This is a good thing.


Then once you get your skirt pinned to your elastic, sew them together. Again straight line, nothing fancy like back flips or the like.

Now I am not sure if you can see it here, but when I gathered my sections together I did kind of a fold. Imagine taking a piece of note book paper and taking once end to meet in the middle and the same with the other. That's basically what I did here.
This is what mine look like after.  I made my seam.
Now I forgot to take picture of the next part but if you need me to, just leave a comment and I will go back and take a new one. So with the nice parts folded in (the outside of the skirt, the pretty side you want everyone to see.) You want the side ends to meet. Give yourself about an 1/2 to and 1 inch hem space on this, this will also depend on how much extra fabric you gave your self in the beginning, you know the part with the two finger space. Start with the elastic end (trust me, never ever start your side hem from the bottom, it is easier to fix if you mess up if you start from the top.) 

I usually recommend pin your sides together so they don't slip but if you have been at this a while, your sewing a straight line again so no worries. Sew your side hem in a straight line from top to bottom, including the elastic. The next step is the hem. Now hems are not scary, no need to get fusing tape, that's cheating and plain lazy. Don't waste your money. 

Once you have sewn your side hem, slip the skirt on and see where you would like the skirt to end. If this is your first time, try to get someone to help you fold your skirt in and pin so you can kind of see if you have a straight line. If you cut it crooked, that is the beauty of a hem, hide it there! Ok you can do this freestyle to form your hem, it's sloppy but I recommend using an iron. So lay your skirt down, fold in 1/2 inch of fabric and iron a crease. Then fold that in half so your raw edge is folded in and hidden, and iron. 

Pin if you need to, but take this and sew your skirt hem. a 360 degree straight line. Then you are done. Flip it back out and slip on! Now if you wish you can add some trim like I did. I found some black lace trim and just simply stitched it on with the machine.


So I hope you enjoyed this post and try it, especially if you have never sewn before or you are afraid the machine is going to eat your hand. Please leave a question for clarification if you need, I would love to assist! Live, Laugh, Love!